:max_bytes(150000):strip_icc()/SLnew121-ef06bf9477ec4706b5a8c1440544bda3.jpg)
:max_bytes(150000):strip_icc()/emilyhendersondesignphotobysarahligoriatrampchristmasbannister-a79dd6ef2c21477698c2a2398a5775e1.jpeg)
'Tis the season to deck the halls and enjoy all that the holidays have to offer. There's far more to decorating your home for Christmas than stringing lights on the tree or hanging a wreath on the front door, though.
Keep in mind that the staircase and its surrounding area is also an excellent place to incorporate some festive touches. No matter whether your staircase is on the smaller side or is relatively expansive, you can get ultra creative with garlands, ornaments, and other decorative accents.
These festive staircase decorating ideas will have you feeling holly and jolly in no time.
- 01 of 40
String Some Lights
:max_bytes(150000):strip_icc()/247039903_554258452537415_1209467415191467320_n-87b0c29f8e074dd5a58da557ca62f782.jpg)
@gems_home_ / Instagram
Zhush up your garland by layering in other festive touches, such as pinecone-shaped string lights and little village houses. This setup is excellent for those who prefer a more subdued color scheme (there's no bold red to be found here) but are still all about embracing the holiday spirit.
Continue to 2 of 40 below - 02 of 40
Add Some Extras
![christmas stair decorations]()
@dailefarrell / Instagram
Have fun with the area in front of your staircase, too—incorporating a small basket, stool, or both will allow you to display additional seasonal accent pieces that will make you smile every time you walk in the door.
Continue to 3 of 40 below - 03 of 40
Spell it Out
![christmas stair decorations]()
@sagelantern / Instagram
Oversized letters can be used to spell out a seasonal phrase like "joy" or "Noel," and we love the idea of placing a wreath where the letter "O" should go to create a little extra holiday spirit.
These letters can easily be found at craft stores and can be painted or customized to your liking.
Continue to 4 of 40 below - 04 of 40
Hang Those Stockings
![christmas stair decorations]()
@shellysfarmhouse / Instagram
No chimney? No problem. Hang stockings by the staircase with care for a fun spin on tradition. Bonus points if you include one for your furry friend, too.
Continue to 5 of 40 below - 05 of 40
Go for the Gold
![christmas stair decorations]()
@sweetzuzudesigns / Instagram
For a glam take on holiday decor, go for white and gold accents like these elegant stockings that complement the elegant grandfather clock nestled beneath the staircase.
Continue to 6 of 40 below - 06 of 40
Transform Your Table
![christmas stair decorations]()
@decoratinglife.ca / Instagram
Have a small table that lives at the bottom of your stairwell? Give it a makeover for the holidays and display mini trees, candles, ornaments, or whatever else strikes your fancy on top. Adding small doses of Christmas decor throughout the home doesn't have to be complicated.
Continue to 7 of 40 below - 07 of 40
Do a DIY
![christmas stair decorations]()
@hilltown_house / Instagram
If you're in the mood for a DIY, construct your own garland using dried orange slices and sprigs of greenery. Bring on the festivity and yummy scents.
Continue to 8 of 40 below - 08 of 40
Bring on the Bells
![christmas stair decorations]()
@sweetcarolinefarmhouse / Instagram
Bells look elegant and pop against this garland-wrapped black banister. It's easy to jazz up a plain garland with festive touches—ribbon is a no-fail addition, too.
Continue to 9 of 40 below - 09 of 40
Make a Statement
![christmas stair decorations]()
@tiatalula / Instagram
Paper decorations are ultra timeless and look fantastic paired with greenery. If you're looking to make a garland appear more full and intricate, try weaving in strands of eucalyptus.
Continue to 10 of 40 below - 10 of 40
Hang a Sunburst
![christmas stair decorations]()
@designbydama / Instagram
These DIY paper sunbursts look like snowflakes when paired with seasonal greens. Sans garland, these decorations don't scream "Christmas" and therefore can be kept on display all winter long.
Continue to 11 of 40 below - 11 of 40
Try Some Ivy
![christmas stair decorations]()
@edwardian_seaside_home / Instagram
If you're looking to add more greenery beyond just a garland, think about displaying ivy on the staircase, too, and weave in some berries. To add some extra color, place berry branches in a vase, and you're golden.
Continue to 12 of 40 below - 12 of 40
Extend an Olive Branch
![christmas stair decorations]()
@thatfunkymonkeysb / Instagram
You don't need to go overboard on Christmas trees when decorating for the season—if you wish to incorporate year-round plants into your staircase design, go for it.
Here, an olive tree pairs perfectly with an olive branch-style garland for a Mediterranean-inspired take on seasonal decor.
Continue to 13 of 40 below - 13 of 40
Keep it Classic
![christmas stair decorations]()
@rumfieldhomestead / Instagram
If you're a traditionalist, there's nothing better than a classic garland with some dried orange slices—and of course, plenty of big red bows. This setup is super budget-friendly, too.
Continue to 14 of 40 below - 14 of 40
Tie a Bow
![christmas stair decorations]()
@ivorylanehome / Instagram
If your decor already leans more vintage-looking or shabby chic, you can create a similar look with white bows. Keeping ribbons nice and long adds an extra dose of elegance.
Continue to 15 of 40 below - 15 of 40
Collect Some Pinecones
![christmas stair decorations]()
@moxieandmint / Instagram
Add an additional natural touch to your garland with pretty pine cones. Whether you purchase some or go foraging in your own backyard, they're gorgeous to display in various ways all winter long.
Continue to 16 of 40 below - 16 of 40
Trim the Tree
![christmas stair decorations]()
@bloom_jennybrooks / Instagram
If you don't want to disrupt your living room or family room layout, you can always place your tree in the stairwell. This display brings so much joy with the addition of a garland, bows, and beads going up the banister.
Continue to 17 of 40 below - 17 of 40
Think Tall
![christmas stair decorations]()
@handmadeforeverhome / Instagram
Climbing this garland-filled staircase is just half the fun—the real reward is at the top. Hanging ornaments from the ceiling is a great way to keep the spirit going all throughout the house.
Continue to 18 of 40 below - 18 of 40
Light it Up
![christmas stair decorations]()
@thehousethatbrumbuilt / Instagram
You don't need a long winding banister to make your staircase look pretty. Even a simple railing can be jazzed up with decor—and lining the steps with cute flameless candles really adds some oomph.
Continue to 19 of 40 below - 19 of 40
Stay Natural
![christmas stair decorations]()
@hannahbeaumontlaurencia / Instagram
For a more rustic look, style your garland in an imperfect fashion, allowing branches of various lengths to pop out. This is an excellent way to achieve a cozy, secluded cabin look at home.
Continue to 20 of 40 below - 20 of 40
Enjoy Eucalyptus
![christmas stair decorations]()
@firstsenseinteriors / Instagram
Skip the regular garland and opt for eucalyptus if you like. Scattering ornaments throughout is a simple way to elevate a classic.
Continue to 21 of 40 below - 21 of 40
Get Crafty
![christmas stair decorations]()
@dwellaware / Instagram
For an ultra-cute DIY, make mini Christmas trees out of wooden dowels and attach them to your garland, like Dwell Aware did here.
These decorations would also look adorable lining the mantel or standing atop a dresser.
Continue to 22 of 40 below - 22 of 40
Make a Major Statement
![christmas stair decorations]()
@showpiece_events / Instagram
Go big or go home. If you're all about larger-than-life cheer, display Nutcracker statues that will command guests' attention, and steal the show.
Continue to 23 of 40 below - 23 of 40
Embrace the Basics
![christmas stair decorations]()
@riveroakhome / Instagram
Not into adding bits and bobs galore to your garland? There's nothing wrong with simply sticking with the basics. We can imagine this stairwell smells pretty darn amazing, too, thanks to all the evergreen.
Continue to 24 of 40 below - 24 of 40
Decorate With Vintage Cards
![christmas stair decorations]()
Decorate your staircase garland with vintage Christmas cards and letters attached with wooden clothespins for a nostalgic feel, like this space from Inspired By Charm.
Continue to 25 of 40 below - 25 of 40
Make it Kid-Friendly
![christmas stair decor]()
Design by Emily Henderson Design / Photo by Sara Ligorria-Tramp
Emily Henderson Design decked out niches under the staircase and on the half landing of this open staircase with holiday touches like a wreath and a mini Christmas tree and decorative star wall light.
A pair of fluffy stockings hanging from the open wood slat staircase wall adds some festive warmth to the modern kid-friendly space.
Continue to 26 of 40 below - 26 of 40
Hang Snowflakes and Stars
![decorate christmas stairway with snowflakes and stars]()
@martinas_cosy_crib / Instagram
Hang paper snowflakes, carved metal stars, and string lights on your staircase to create a warm and cozy feel as soon as you walk in the door, like this space from Martinas Cosy Crib.
Complement the stairway decor with a simple door wreath and a lighted mini tree.
Continue to 27 of 40 below - 27 of 40
Incorporate Vintage Pieces
![decorate farmhouse stairway for christmas]()
Decorate a white farmhouse staircase with natural greens, neutral bows, and a DIY orange slice garland for a pop of warm color. Then pile extra garlands in a vintage sleigh for a Scandi-style look, like this space from Liz Marie Blog.
Continue to 28 of 40 below - 28 of 40
Accent With Red
![decorate traditional stairway for christmas]()
A potted poinsettia in a vintage crock at the foot of the stairs and a draped staircase banister garland decorated with red and silver ball ornaments and white bows add a festive feel to this traditional Christmas stairway from Brexton Cole Interiors.
Continue to 29 of 40 below - 29 of 40
Try Oversized Pine Cones
![decorate modern stairway for christmas with pine cones]()
@wildrosecountryhome / Instagram
Decorate a green garland with oversized pine cones for a natural look. Add some bling by decorating the staircase wall console table with a mix silver and gold accents and a large floral arrangement like this space from Wild Rose Country Home.
Continue to 30 of 40 below - 30 of 40
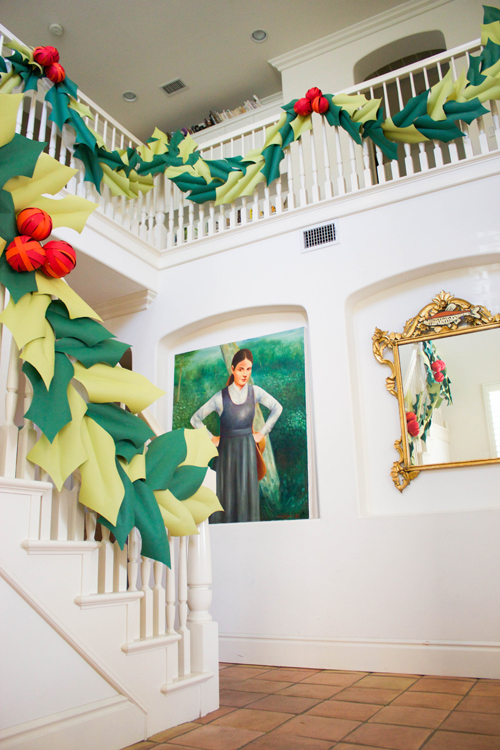
Try a Supersized Garland
![diy decorate christmas stairway]()
Decorate an open double-height staircase with an oversized paper garland, a fun DIY project to put yourself in a holiday mood.
The House That Lars Built decorated this airy stairway with a giant paper holly and berry garland that gives the entryway a storybook Christmas feel.
Continue to 31 of 40 below - 31 of 40
Use Natural Greens
![decorate stairway for christmas with natural greens]()
Decorate your stairway for Christmas with natural greens wrapped around and tied to the handrail with neutral cream-colored ribbons for a minimalist feel. Finding Lovely carried the natural greens throughout the entryway for a cohesive feel.
Continue to 32 of 40 below - 32 of 40
Decorate Under Stairs
![decorate under stairway for christmas]()
Complement a staircase garland with a Christmas display in your under-stairs niche for an extra-festive look. Liz Marie Blog dressed the staircase in a voluminous green garland decorated with silver bells and earthy green ribbons.
Under the stairs, a vintage toboggan is used for a Christmas card display alongside a vintage painted Santa for a festive and kid-friendly holiday vignette.
Continue to 33 of 40 below - 33 of 40
DIY a Popcorn Garland
![decorate stairway for christmas with popcorn garland]()
Get out your needle and thread and string up an old-fashioned DIY popcorn garland to decorate your stairway.
Inspired By Charm layered a simple popcorn garland over a green garland and finished it with pine cones and shiny red ball ornaments for a modern take on the popcorn and cranberry garlands of old.
Continue to 34 of 40 below - 34 of 40
Line Steps With Plants
![decorate stairway steps for christmas]()
Decorate your stairway for Christmas by lining the steps with a row of identical potted plants. Craftberry Bush complemented the simple elegant greenery with a staircase banister garland in this bright holiday-ready entryway.
Continue to 35 of 40 below - 35 of 40
Stick to Black and White
![black and white christmas stairway decorations]()
Emily Henderson Design / Photo by Sara Ligorria-Tramp
If your stairway is modern and minimal, focus on decorating the wall at the base of the staircase rather than the stairway itself.
Emily Henderson Design chose Scandi-style black-and-white decor to match the minimalist mountain house aesthetic here, with a flocked wreath and an assortment of white and glass Christmas tree votives decorating the black console table for a sophisticated look.
Continue to 36 of 40 below - 36 of 40
Use Earthy Neutral Tones
![decorating stairway for christmas with bells]()
Accent your Christmas stairway garland with earth-toned velvet ribbons for a vintage feel, like this warm and homey space from Finding Lovely.
Continue to 37 of 40 below - 37 of 40
Add a Landing Tree
![decorating stairway landing for christmas]()
@martinas_cosy_crib / Instagram
Decorate a staircase landing with a mini tree to make the journey between floors feel festive, like this space from Martinas Cosy Crib.
Continue to 38 of 40 below - 38 of 40
Decorate the Base
![decorating antique stairway for christmas]()
Rather than embellishing the handrail, decorate the base of your staircase banister for Christmas with a fluffy green and white garland, like this traditional front hallway from Finding Silver Pennies.
Continue to 39 of 40 below - 39 of 40
Have a White Christmas
![decorating modern farmhouse stairway for christmas]()
Decorate an airy all-white modern farmhouse-style stairway for Christmas with flocked greens and giant white bows, like this space from Thistlewood Farms.
Continue to 40 of 40 below - 40 of 40
Paint Some Ornaments
![decorating stairway for christmas with hand-painted ornaments]()
Create your own custom Christmas palette by hand painting inexpensive ball ornaments to decorate a stairway banister, like this dreamy candlelit Christmas foyer from designer Annie Sloan.
:max_bytes(150000):strip_icc()/76881879_499269534026121_6571222538351276084_n1-a4a1d322b6524f4180ed15c400ca0cf5.jpg)
:max_bytes(150000):strip_icc()/126159903_429448838062516_5716997123086717511_n-bc90caae268a4403afd6c2bd585ba5f7.jpg)
:max_bytes(150000):strip_icc()/132481283_728202838072787_7785009372912898142_n-0b5254f2aa9f463d82bf6a2cf07ac22a.jpg)
:max_bytes(150000):strip_icc()/131981286_729033674694561_125954549787371417_n-4ffaf515eba04f7ab17295299827d464.jpg)
:max_bytes(150000):strip_icc()/131896849_148019086778751_4848935752506214309_n-1d379bbf4714417d849d7a29b9666fb6.jpg)
:max_bytes(150000):strip_icc()/131306958_1451391845067231_370244367986399425_n-105d8cef9635451fa43c4d34308b243f.jpg)
:max_bytes(150000):strip_icc()/131002093_1670327129811901_4738273364741907637_n-b75e80abdeaf4815a6430e00cd7fa7a5.jpg)
:max_bytes(150000):strip_icc()/130714242_384248376192760_1251251442477551976_n-9dd763c524dc4c32b528c3621daedef9.jpg)
:max_bytes(150000):strip_icc()/129723891_229891725167197_4504588323515469496_n-f79deb3eeca3433fbbd70a161721cd0b.jpg)
:max_bytes(150000):strip_icc()/129722509_392998942138938_1231724635260972087_n-c2fc0b9223a244c98265518e96020ddc.jpg)
:max_bytes(150000):strip_icc()/128787045_3564615833626091_4344261890452305342_n-61364216acbc4988931b395dce8a7ad7.jpg)
:max_bytes(150000):strip_icc()/128541172_132639445303280_4005844539274478726_n-7b6ab3bfd62a46458382456b6ea0ca8c.jpg)
:max_bytes(150000):strip_icc()/255574971_1051068749051154_8572695769561747067_n-01e898c9bce94e2bb804144135536f30.jpg)
:max_bytes(150000):strip_icc()/257688097_1107146130098420_1329317638054281440_n-f77fedf35e5c43798f9a6572eb4563ca.jpg)
:max_bytes(150000):strip_icc()/254882053_883357778828941_8193042982598145490_n-bd26d994ca52487ebffffce0e483aa0c.jpg)
:max_bytes(150000):strip_icc()/132190478_104290364833484_4226735113696192846_n-9c63ab00519941f99b07b72a070cb8c3.jpg)
:max_bytes(150000):strip_icc()/129401123_380583979894097_7792034250102057484_n-21d17b965dbd416a9ef5e8a796ad1d57.jpg)
:max_bytes(150000):strip_icc()/133322134_874782876684943_460341572955618191_n-bf8b8898d2df4785adb6bb1bf8f66015.jpg)
:max_bytes(150000):strip_icc()/133898432_406903777393767_2701718470179817220_n-55f3174d47ea450ca29bf23b2339f86d.jpg)
:max_bytes(150000):strip_icc()/130113457_812227746020670_2071288778315677108_n-1758fa37388140adb65aff239f67187e.jpg)
:max_bytes(150000):strip_icc()/251525886_258018753015126_8662530836752248400_n-f212d2c1ba1942afac25d5b6f4a17b95.jpg)
:max_bytes(150000):strip_icc()/259607731_620570112313835_4574878007648842892_n-c3a8fc0b51a34608910dc20ab2843e40.jpg)
:max_bytes(150000):strip_icc()/christmas-staircase-garland-573dd02efca843408088d85e333796a5.jpg)
:max_bytes(150000):strip_icc()/DesignbyEmilyHendersonDesign_WinterMountainHouse_PhotobySaraLiggoria-Tramp_11-1-6c8fb55e48d4401e848218481d73ba2a-de426f4c77694d4789af20a2b7ac583f.jpeg)
:max_bytes(150000):strip_icc()/martinascosycribtreeinplanter-7614e3baee8f41a1a703102cdf4612a9-1b9dfafcbef04f8f910d1dbead3c7b95.jpg)
:max_bytes(150000):strip_icc()/IMG_2775-scaled-d8baaa4c64d448b7a5cede9268b7f510.jpg)
:max_bytes(150000):strip_icc()/BrextonColeInteriorsHoliday-3a766ce062754b16832593363ddc4e38-750d54a8bcf54e019ed88ed6cad5ab91.jpeg)
:max_bytes(150000):strip_icc()/wildrosecountryhomechristmas4-522269605952483794ce624b26a56f41-12abb7f724b94c2989e716e2efb268b2.jpg)
:max_bytes(150000):strip_icc()/Screenshot2023-11-28at11.19.47AM-f46379e36abc49898a35134bd8f758a0.jpeg)
:max_bytes(150000):strip_icc()/311_websize-46144e68fa304024a1d01d5db43cce51-6c0c2e9124e44615a4da946e1ac8ec6d-1ccc650a44c6407eb3fffb61d21a08a7.jpg)
:max_bytes(150000):strip_icc()/IMG_7346-scaled-9843531d95ec42119d25e554bac0d3b4-484d761a28e44f808f6a10a51847d778-ca68af786981483687720702016cad3e.jpg)
:max_bytes(150000):strip_icc()/popcorn-garland-decorcopy-ec6f554932d54be8a499bfdbc40e3d37.jpeg)
:max_bytes(150000):strip_icc()/Christmashometourcraftberrybush-5-e9c5a89289e8445594a7de146e676041-2b06e4b4b990443aa22da8bff87f30b7.jpg)
:max_bytes(150000):strip_icc()/DesignbyEmilyHendersonDesign_WinterMountainHouse_PhotobySaraLiggoria-Tramp_13-7167714be89340b0a235a85ea969eb5f-cb36b310b0ce4ce8b261c56927723ee5.jpeg)
:max_bytes(150000):strip_icc()/DSC01781-f74ed34063ee47b3a3df5a8ea95ea2ee-258dacdfa6ca43bfb3f83fee27744dfb.jpg)
:max_bytes(150000):strip_icc()/martinascosycribtinytreebiglights-7bfd5b49d1b0457fb298c60fdfc7a97a-ed9224e3d13f4c1ea7b112ec559ebd69.jpg)
:max_bytes(150000):strip_icc()/Window-Garland-Front-Hall-Finding-Silver-Pennies-2-f8f4832b5f484f07b484d8824948c10f-d7c6137f1c6f4b64baf93c9f1be7ae91.jpeg)
:max_bytes(150000):strip_icc()/Christmas-Staircase-4-1-05f6b2914b4d4762a76aef599f618e9b-bfd2e187fbe74e24b4c37eff76c37de0.jpeg)
:max_bytes(150000):strip_icc()/AnnieSloan-Christmas-Hallway-SatinPaintinCanvasTyrianPlumWallPaintChalkPaintinBurgundymix-Lifestyle-Portrait1-2ff95f96f0cb43b894449edc69529d68-ec39841c65ca4277aecc4aadaf0283db.jpg)
:max_bytes(150000):strip_icc()/diy-christmas-garland-ideas-8303241-hero-ca978a82dc724c858148eb01bcd24024.jpg)
:max_bytes(150000):strip_icc()/190806.BHG.SugarPaperHoliday.0871-copy-d465af8b40d04e9babfaa2ac37d02a59.jpg)
:max_bytes(150000):strip_icc()/YbarraChristmas-FormalLiving3-4b3792eec94f466096fdda92e1d8809a-06041dcca854415bb6b3d22c7b03c7cb.jpeg)
:max_bytes(150000):strip_icc()/SPR-Christmas-Mantel-Decor-Ideas-4151782-hero-56abbd2d61154ece9fe1d70b82f91de8.jpg)
:max_bytes(150000):strip_icc()/christmas-porch-decor-ideas-4150381--3-c2488e6e7a3d4633a4f9ae9dd3fc5eb0.jpg)
:max_bytes(150000):strip_icc()/outdoor-christmas-decoration-ideas-5203674-hero-50661d5e10394b55bbc505aaf469e488.jpg)
:max_bytes(150000):strip_icc()/GettyImages-1363703030-6413b4aaf188479392a5abb268a8a013.jpeg)
:max_bytes(150000):strip_icc()/TheSpruce_EEBerger_1-b2fbe7470d3f4e4f90773078360409b7.jpg)
:max_bytes(150000):strip_icc()/DSC01746-525e645b6b2242deb10b9f03075f6fb3-800f2ce2290e4767b847b157fc3b621c.jpg)
:max_bytes(150000):strip_icc()/Holiday-2023-Collection105-d1a4abe3c0b345d88fdfac009ab2b6cb.jpeg)
:max_bytes(150000):strip_icc()/DesignbyEmiyHendersonDesign_PhotobySaraLigorria-Tramp_EmilyChristmas2020_1-2e512f592af54d4a8775c569ba0427b8.jpeg)
:max_bytes(150000):strip_icc()/christmas-garlands-tout-dcee1636c3d141b7b96cac9fe3d6a965.jpg)
:max_bytes(150000):strip_icc()/DesignbyEmilyHendersonDesign_WinterMountainHouse_PhotobySaraLiggoria-Tramp_9-3110ceeb4e2a48b98fff2f342d9e49a6-ca8121170a404c219310092f86109e58.jpeg)
:max_bytes(150000):strip_icc()/ModernGlamChristmasPorchPreview-1-9-6a8c393083f440b98ab6acc0acb878b4.jpg)
:max_bytes(150000):strip_icc()/DesignbyEmilyHendersonDesign_KidInspiredChristmas_PhotobyTessaNeustadt_3-2db6e98b71cd40d7ba08ba406ed4d0ed.jpeg)
:max_bytes(150000):strip_icc()/white-door-green-christmas-wreath-finding-lovely-bfa3dca4a0844d89970184a5edeca245.jpeg)